GTA 6 settings to change first: controls, aiming, HUD and graphics
One of the first things GTA 6 asks you, before it even shows you Leonida, is how you want your minimap. That’s a good hint: this game’s Settings menu is long, full of new options, and it breaks several GTA 5 habits, starting with the button you run with. This guide sorts out what’s worth changing in your first half hour and leaves the rest alone.
A fair warning first. Rockstar hasn’t published a full list of the options: its November 10 Newswire post only mentions vibration being adjustable from the accessibility options. What follows comes from the outlets that have seen the menu (Digital Foundry, Push Square, VGC, GamesRadar+, GameRant, TechRadar) and from the people who catalogued the accessibility options. When a detail comes from a single source, you’ll find it in a “reported” box. Controls are given for PS5, with the Xbox equivalent in brackets.
The 10 settings to change first
| # | What to do | Where | Why |
|---|---|---|---|
| 1 | Pick a Navigation Experience, then fine-tune the HUD | First boot, then Settings | It decides how much minimap and markers you see |
| 2 | Switch to Classic if your GTA 5 muscle memory keeps failing you | Control Scheme tab | Sprint goes back to Cross (A) instead of L3 |
| 3 | Choose an aiming profile | Gameplay > Combat | Lock-On, Partial and Free Aim change every gunfight |
| 4 | Turn Shooting Assist off if you want truly free aim | Gameplay > Combat | It still snaps to nearby targets in Free Aim |
| 5 | Set motion blur between 2 and 4, to taste | Visual effects | It’s one of the few graphics sliders: smoothness versus clarity |
| 6 | Subtitles: size and background | Settings, subtitle options | Readable from the couch |
| 7 | Vibration and triggers | Game and console accessibility options | Your trigger finger will thank you after an hour of shootouts |
| 8 | Assist options, if you need them | Bottom of the Gameplay tab | There’s no difficulty setting, and these don’t affect trophies |
| 9 | Vehicle camera | In a car: hold Down on the d-pad + Square (X) | Three camera distances |
| 10 | On Xbox try 120Hz with VRR, on PS5 don’t bother | Console settings | A bit smoother on Xbox, no change on PS5 |
1. First boot: the Navigation Experience
On first boot the game asks you to choose a Navigation Experience, with no preview of how it will look on screen. There are three options:
| Option | What it does |
|---|---|
| Minimap (Dynamic) | The minimap only appears when needed: you call it up with the d-pad and it hides during quiet moments |
| Minimap and Compass (Dynamic) | Same as above, plus a compass showing your own waypoints, mission objectives and nearby points of interest |
| Always On | The minimap is always visible, as in GTA 5 |
VGC’s Jordan Middler puts it plainly: don’t overthink it, it’s just a way to get you into the game faster. The settings hold dozens of navigation and interface options, so you can fix the choice later in a minute. If you’re coming from GTA 5 and feel lost without a minimap, Always On is the safest start; if you want to take in the city, the dynamic version clears a lot of clutter off the screen.
2. Controls: Default or Classic
The change you’ll feel most is sprinting. In the new Default scheme you run by clicking the left stick (L3), and Cross is used to jump and climb. Anyone who spent years in GTA 5 running with Cross will find out during their first police chase.
The Classic scheme puts things back the GTA 5 way. You’ll find it under Options (Menu) > Settings, in the first tab, Control Scheme: switch it with the d-pad, then back out with Circle (B) and hold Cross (A) to confirm. Classic only changes four actions; every other control stays the same:
| Action | Default, PS5 (Xbox) | Classic, PS5 (Xbox) |
|---|---|---|
| Run and sprint | L3 (left stick click) | Cross (A) |
| Jump and climb | Cross (A) | Square (X) |
| Melee | Square (X) | Circle (B) |
| Crouch | Circle (B) | L3 (left stick click) |
Sprint moving to L3 had already surfaced in the September previews, and Kotaku pointed out that GTA 5 already let you run by holding Cross. If clicking the stick wears out your thumb, Classic is the simplest fix.
3. Aiming: Lock-On, Partial or Free Aim
The aiming options live under Pause > Settings > Gameplay tab, in the Combat section at the top of the list. There are three targeting systems:
| System | How it works |
|---|---|
| Lock-On | When you aim with L2 (LT) the reticle instantly locks onto the target closest to it |
| Partial | It doesn’t lock on, but it pulls your aim towards a nearby target (the in-game text: “will move towards a nearby target but will not lock on”) |
| Free Aim | No help at all |
Around them sit the options that fine-tune the behaviour: Aim Assist Strength (how strongly your aim is pulled towards the target, on a scale that tops out at 4), Lock-On Time (how long the reticle sticks to a moving target), Lock-On Target Switch (switch targets with a flick of the right stick), Drive-By Assist (auto-aim at the nearest target while driving) and Quick Draw (hold L2 and press R2 to pull out the last weapon you used). Then there’s Shooting Assist, which is a separate option: even in Free Aim it still gives you a quick lock-on to targets very close to you. If you want zero help, turn it off.
GameRant’s Mehrdad Khayyat suggests two ready-made profiles, which make a good starting point:
| Option | Relaxed profile | Realistic profile |
|---|---|---|
| Targeting system | Lock-On | Free Aim |
| Aim Assist Strength | 3 | 0 |
| Lock-On Time | 5 (max it out if moving targets keep escaping you) | not needed |
| Lock-On Target Switch | on | not needed |
| Shooting Assist | on | off |
| Drive-By Assist | on | off |
| Quick Draw | on | on |
| Reticle shape (UI tab) | your call | ”None”, for an extra challenge |
With Lock-On, GameRant notes, aim assist strength barely matters, since the reticle stays locked anyway. It’s the option to tune carefully if you go with Partial.
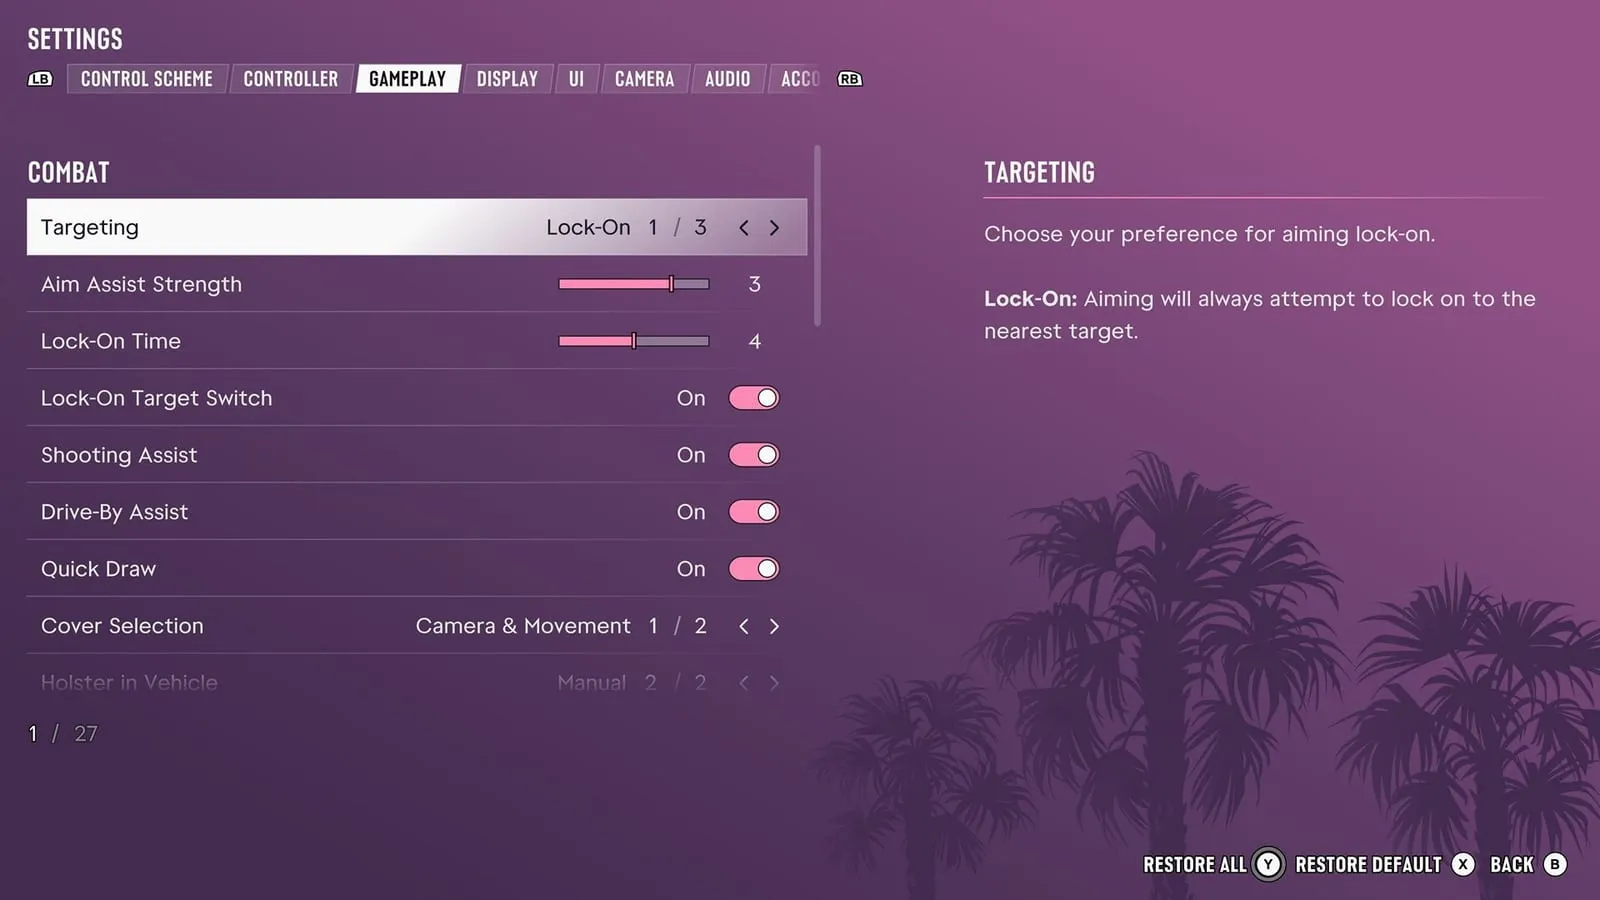
With Targeting on Lock-On the Combat section grows by two entries, Lock-On Time and Lock-On Target Switch, and the Gameplay tab goes from 25 to 27 rows; further down sit Cover Selection and Holster in Vehicle, which decides whether your weapon is put away automatically when you get in a car. In-game screenshot © Rockstar Games, via Game Rant.
A useful tip if you’d rather keep your criminal profile less aggressive: according to Push Square, in Focus (L3+R3) an enemy’s non-vital body parts are highlighted in yellow. A yellow X means the enemy is incapacitated, a red X means you killed them. The rest of the early-game advice is in our guide to what to know before you start.
4. Camera: no first person, three vehicle views
GTA 6 has no playable first-person mode, unlike GTA 5, which added one in 2014. Push Square notes that a few story moments briefly switch to first person, but that’s a directing choice, not an option.
There are three ways to get closer, though:
- Aiming down a scope. With an optic fitted to your weapon (from Ammu-Nation, under Attachments > Optics), hold L2 (LT) and press R3 (right stick click) to aim down the sight. Press R3 again or release L2 to go back.
- Looking around while standing still. Push Square gives the same gesture, L2 held plus R3, to switch to a first-person view without moving, with R2 (RT) to zoom: handy for reading a distant sign. VGC instead describes L2 and then L3 and R3 together. Don’t mix them up: L3+R3 without L2 triggers Focus, which drains its meter. Moving your character takes you out of the first-person view.
- In a car. Push Square says you can’t drive in first person and that there are three views, at different distances behind the vehicle: pick them by holding Down on the d-pad and pressing Square (X). According to VGC, though, the game switches to first person on its own for certain vehicles.
Cars also have a cinematic mode: with the car moving, hold Down on the d-pad and press Options (Menu). If you’ve marked a destination on the map, accelerating a little brings up the auto-drive option: hold Circle (B) and your character drives to the waypoint on their own, with L2 and R2 (LT and RT) adjusting the speed (GameRant, Beebom). According to Beebom, auto drive has to be enabled in the Gameplay tab first.
There are plenty of camera options: TechRadar’s review mentions camera angles, shake and bob, and Can I Play That? also lists camera movement and head bob settings. If motion bothers you, those are the first options to turn down.
5. Graphics: motion blur is almost all you can adjust
The list is short here, and that’s by design. Digital Foundry confirms there are no graphics modes: no 40 or 60fps, no quality versus performance choice, on any console. The game targets 30fps everywhere, PS5 Pro included, as Rockstar had announced: details in our news on 30fps and PS5 Pro.
How should you set motion blur? At 30fps, the blur trail helps hide the jump between frames, especially when you swing the camera or drive fast. The advice is to start from the default: if the image looks juddery in turns, go up to 4 or 5; if it bothers you or gives you a headache, drop to 1 or 2. Zeroing it out of habit, as many players do in other games, risks taking away more than it gives here.
Two options many people will look for that aren’t documented: a film grain setting and in-game HDR sliders. Rockstar told Wccftech it built its lighting and image pipeline with both HDR and SDR in mind from the start, but no source describes an in-game calibration screen: the calibration to do is still the console’s, covered in our TV and console guide.
6. The dynamic HUD and the d-pad
GTA 6’s screen is empty more often than GTA 5’s, and that’s deliberate. With the default dynamic HUD, press Down on the d-pad to see the minimap, your balances (cash and bank) and the health, stamina and Focus bars. Each element can be switched on or off in the settings, so if you want your money always on screen, you can have it.
Holding Down instead brings up a view of nearby places and activities: L1 and R1 (LB and RB) scroll through them, and according to Push Square R3 sets a GPS route to the one you’ve highlighted. GamesRadar+ points out that the settings also let you change how you interact with Leonida’s citizens from inside your car.
7. There’s no difficulty setting, but there are assists
GTA 6 has no difficulty levels, like every GTA before it. It does have a few options that make the game more accessible, at the bottom of the Gameplay tab (Push Square lists them as options 24 and 25):
Game8 also mentions an option to put your helmet on automatically. When you turn the assists on, the game warns that they change “the balance and experience of gameplay”. According to Push Square, they don’t change the story or disable trophies: if a shootout has had you stuck for half an hour, you can switch them on, get past it and switch them off again without losing anything. The full trophy list is in our trophy guide.
8. Accessibility: subtitles, contrast, tinnitus and inputs
There are plenty of accessibility options: TechRadar’s review separates a couple of dedicated ones from many other settings that serve the same purpose. The ones TechRadar and Can I Play That? agree on:
Which languages the game ships with, for dub and subtitles, is covered in our GTA 6 languages guide.
9. TV and console: what’s left to do
System settings, meaning your TV’s game mode, ALLM, HDR calibration, 3D audio and the controller, are explained in our TV and console guide. With the game out, Digital Foundry adds two facts that change the advice on 120Hz and VRR:
That also puts into perspective the claim, which went around after the pre-load, of a 120Hz mode hidden in the files (the story is in our news on the datamine): at launch the game doesn’t offer one, PlayStation has no 120Hz output and on Xbox 120Hz is a console-level feature.
On PS5 you also need up-to-date system software, which Sony made mandatory to launch the game: the version and steps are in our news on the 14.23 firmware. Kotaku also reports a small game update, version 01.002.001 at around 600MB on PS5: queue it alongside the system one. The previous one is covered in our news on the first update.
Frequently asked questions
Does GTA 6 have first person?
No, there’s no playable first-person mode. You can aim down a weapon’s scope (hold L2 and press R3) and look around in first person while standing still; a few story moments switch to first person as a directing choice. Vehicles have three third-person views, and according to VGC some vehicles switch to first person on their own.
Can you turn off the vignette in GTA 6?
No. Digital Foundry confirms that vignetting and depth of field can’t be adjusted, and Rockstar told Wccftech the vignette is an artistic choice, with no toggle in the launch version. Rockstar did fix an issue that made it stronger than intended in some situations.
How do I get the GTA 5 controls back?
Open Options (Menu) > Settings and, in the first tab, Control Scheme, switch from Default to Classic with the d-pad. Back out with Circle (B) and hold Cross (A) to save. With Classic you run with Cross again, jump with Square, melee moves to Circle and you crouch with L3.
Is there a 60fps mode?
No. GTA 6 targets 30fps on PS5, PS5 Pro and Xbox Series X|S, with no performance mode and no 40 or 60fps options. On Xbox, the 120Hz signal with VRR makes the game a bit smoother; on PS5, VRR doesn’t kick in at 30fps.
Can you change the difficulty in GTA 6?
There are no difficulty levels. At the bottom of the Gameplay tab, though, you’ll find Accessible Combat, which reduces the damage you take and increases the damage you deal, and Reduced Vehicle Damage; other options simplify minigames and enable auto driving. According to Push Square, they don’t disable trophies.